Dashboards
Dashboards turn task data into reusable visual comparisons. A dashboard combines:
- Data groups, which define the subsets of samples to compare.
- Plots, which define the variables and visualizations used for the comparison.
- A layout, which defines the order and width of the plots.
Every data group selected in a dashboard is applied to every compatible plot. The group name and color are used consistently in the plot legends, making it easy to compare, for example, a reference batch with a production batch.
Open a task, select Data Explorer, and then select the Dashboards tab to manage dashboards and data groups for that task.
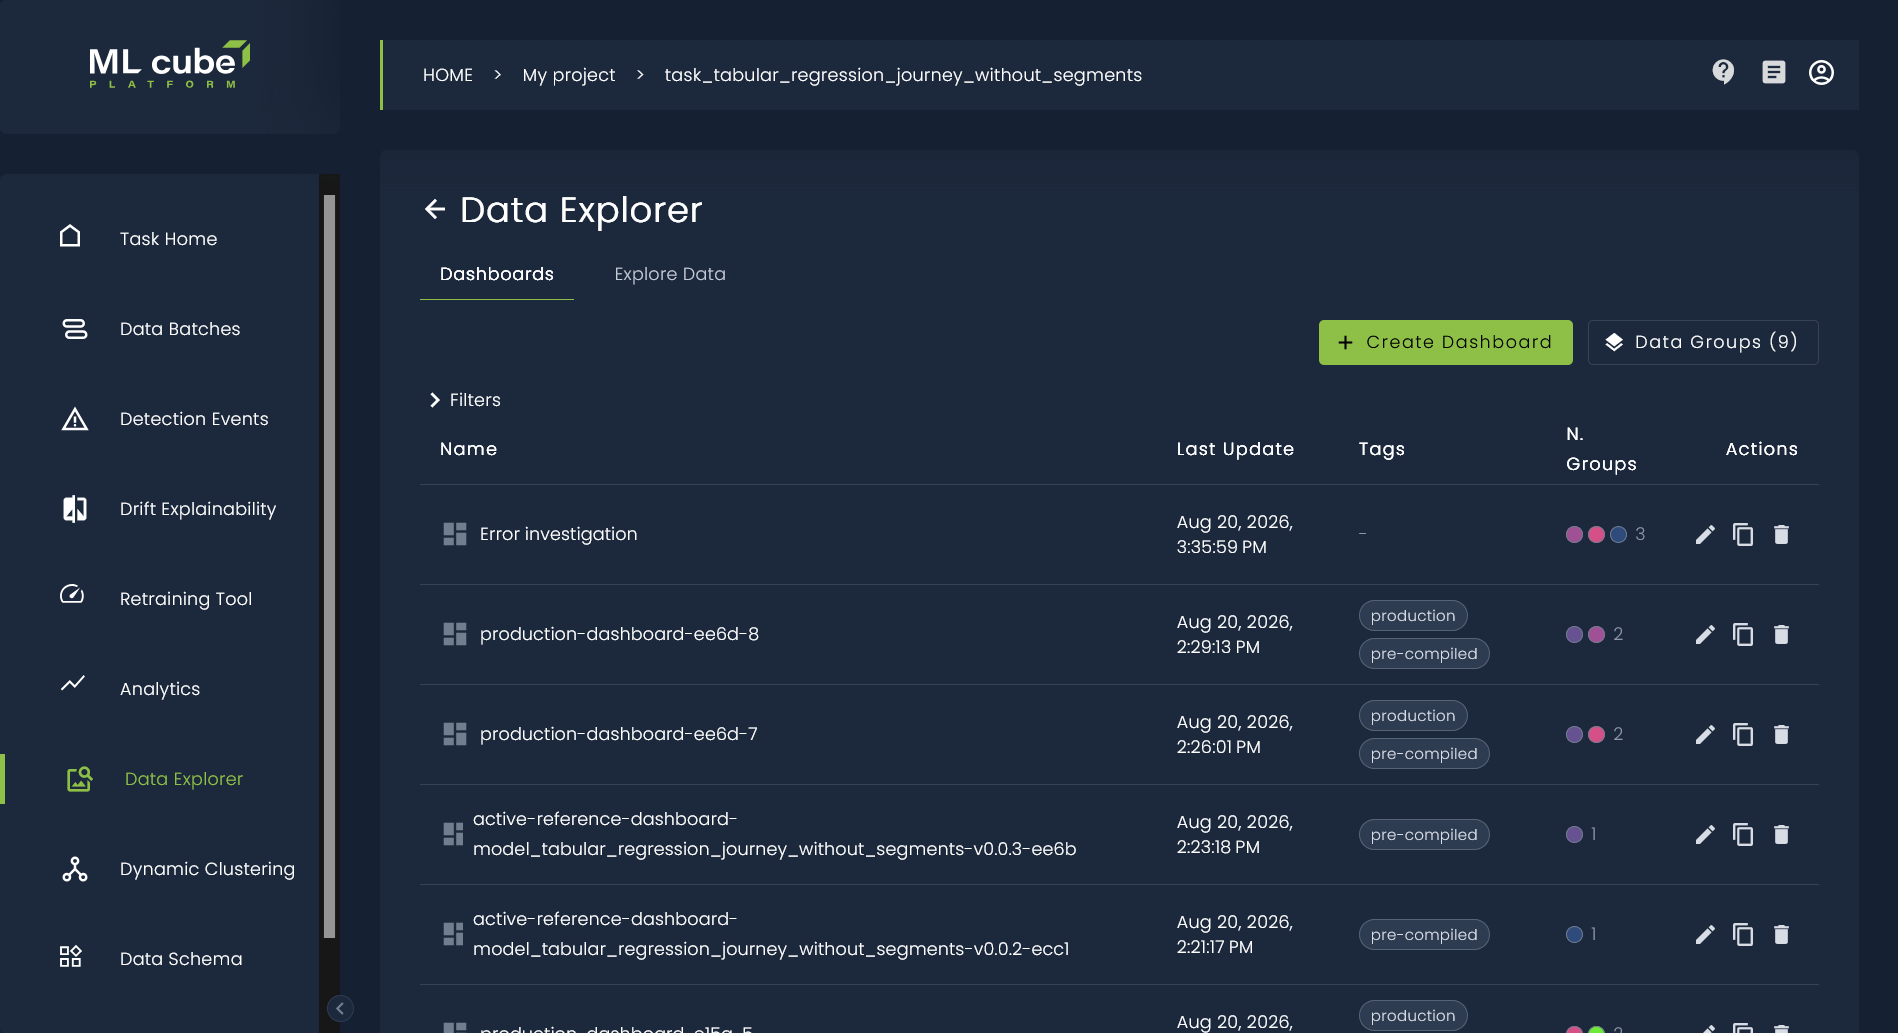
Data groups
A data group is a reusable definition of a subset of the task data. It does not copy samples. Instead, it describes which samples should be loaded whenever the group is used in a dashboard.
A data group contains:
- Name: a unique, recognizable name within the task, such as
Reference,Production batch 12, orSegment A. - Color: the color assigned to the group in every plot and legend.
- Date range and time: an optional time interval used to narrow the samples.
- Batch index: the non-negative batch number to analyze. This field is required for groups that you create
- Segments: optional task segments used to narrow the group further. This field is available only when the task has segments.
- Tags: labels used to organize and find data groups. Tags do not change the samples included in the group.
The batch, time interval, and segments together determine the samples represented by the group. If no time interval or segment is set, that filter is not applied.
Data groups belong to the task, not to one dashboard. The same group can therefore be selected in several dashboards. If you later change its filters, name, or color, every dashboard that uses it reflects that change.
Create a data group
- Open Data Explorer > Dashboards.
- Select Data groups.
- Select New group.
- Enter a unique Name and choose a Color.
- Enter the required Batch index.
- Optionally choose a Date range, Start time, End time, one or more Segments, and Tags.
- Select Create.
The end of the time interval cannot be earlier than its start. If the form cannot be submitted, check the name, batch index, and time interval first.
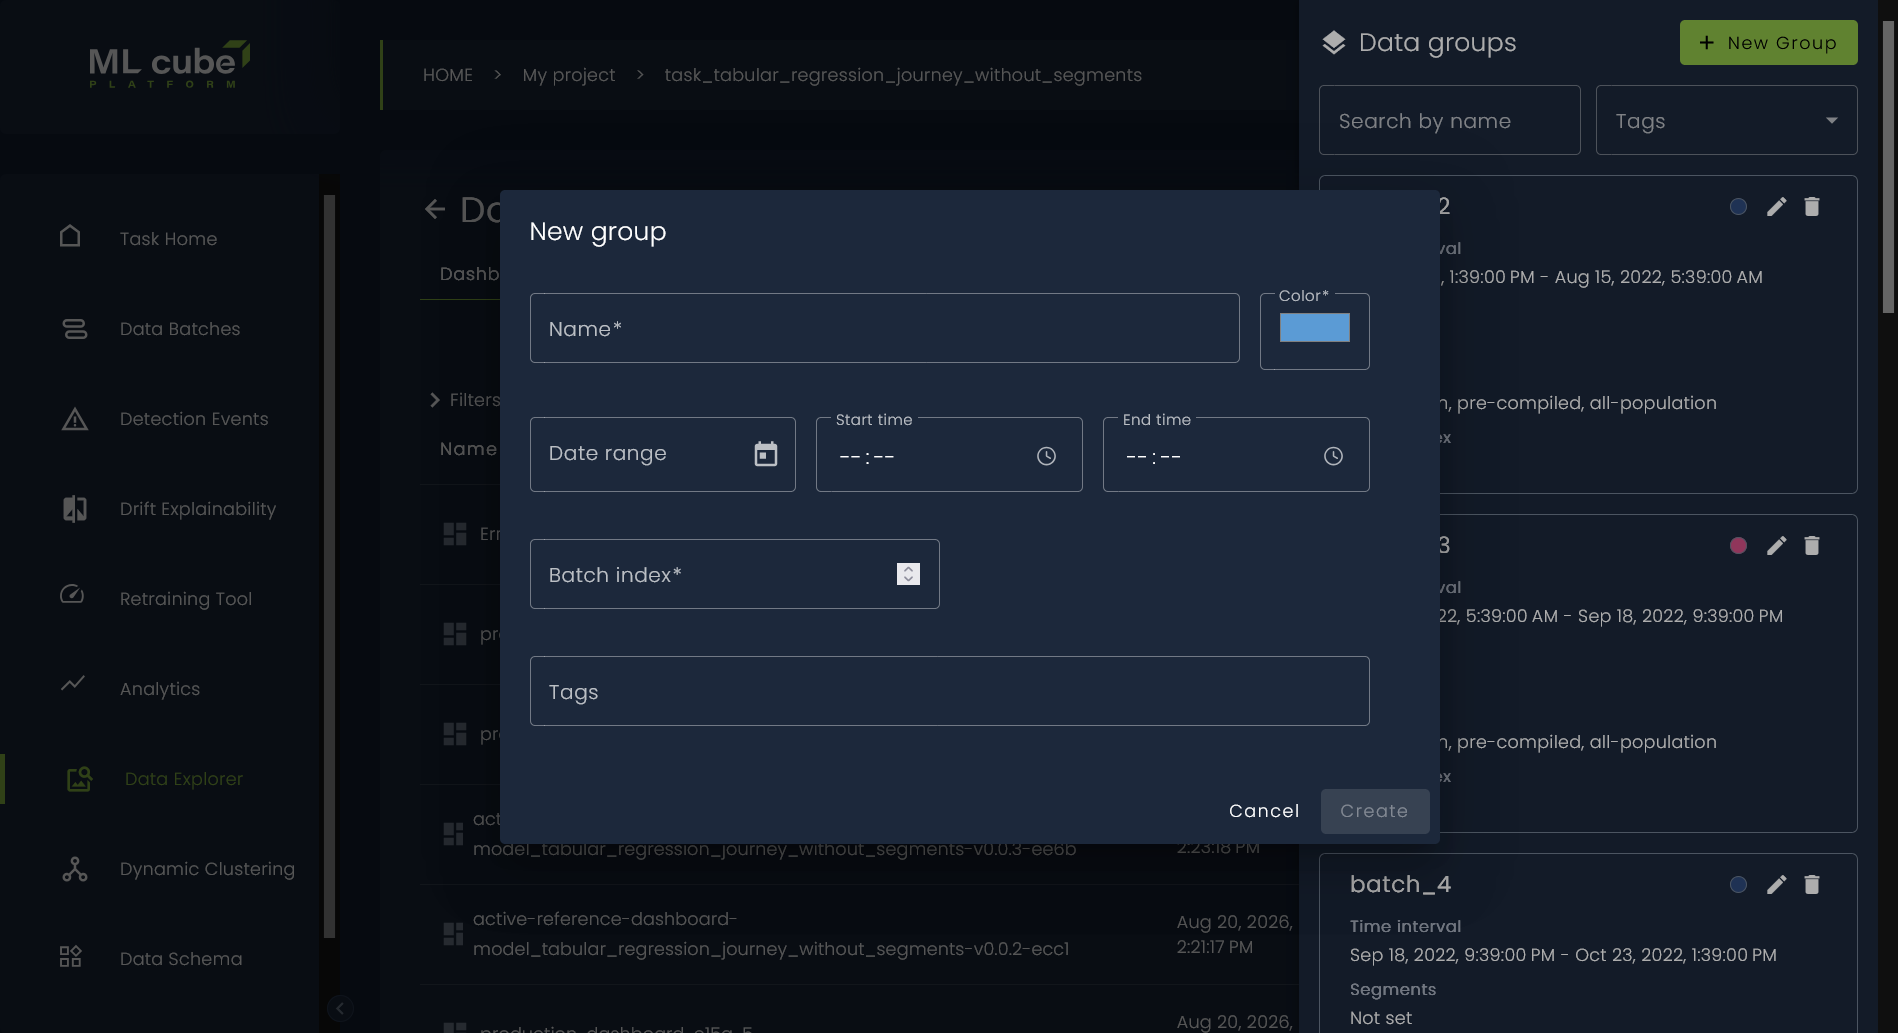
You can also create a group from the last step of the dashboard wizard. The new group is automatically selected for the dashboard when the dashboard limit has not already been reached.
Find and change a data group
Open Data groups from the Dashboards tab. Use Search by name and Tags to narrow the list.
- Select the color dot to change only the group's color.
- Select the edit icon to change its name, filters, color, or tags, and then select Save.
- Select the delete icon to permanently delete the group.
Platform-created groups are read-only, so their edit and delete actions are not available. You can still select the color dot to change their color.
Changing a group's batch, time interval, or segments changes the data displayed for that group in every dashboard. Changing its color or name also changes its appearance everywhere it is used.
Warning
Deleting a data group is irreversible. The group is removed from every dashboard that uses it. The dashboards, their plots, and the task's source samples are not deleted, but an affected dashboard can be left with no selected data groups.
Dashboards
A dashboard is a saved analysis view for one task. It contains a name, an ordered set of plots, a saved width for each plot, and a selection of data groups.
The same plot configuration is evaluated for each selected group. For example, a dashboard with a histogram of age and the groups Reference and Production shows both distributions in the same plot using the groups' assigned colors.
The dashboard list can be searched by name and filtered by available tags. You can also choose a sort field and ascending or descending order. Select a row to open that dashboard.
Templates and other starting points
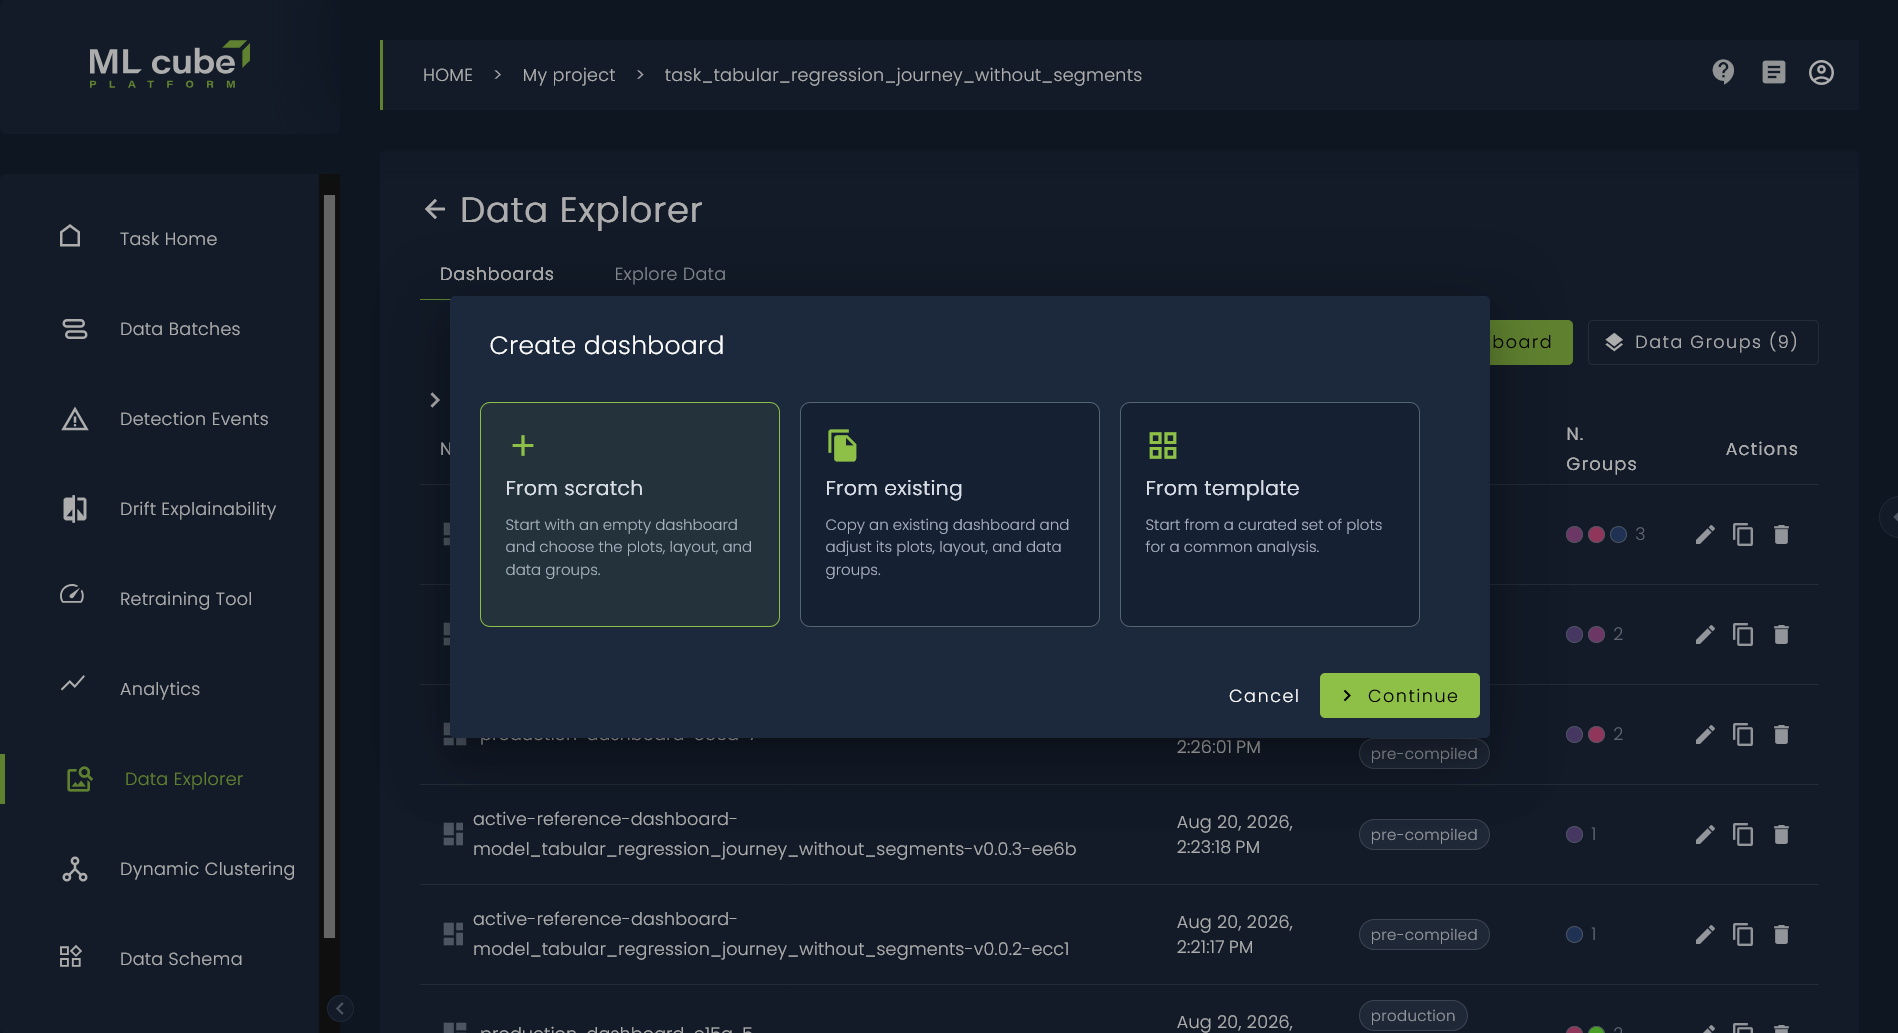
When you create a dashboard, choose one of three starting points:
- From scratch starts with no plots or selected data groups.
- From existing copies the plots, layout, and data-group selection of another dashboard. Use this when you want a variation without changing the original.
- From template starts with a curated set of plots for a common analysis.
A template is a task-aware preset, not a saved dashboard. The platform only shows templates that can produce meaningful plots for the variables available in the current task. A template does not select data groups for you. You can add, remove, reorder, and reconfigure its proposed plots before creating the dashboard.
After creation, the dashboard is independent: changing it does not change the template, source dashboard, or any other dashboard.
Depending on the task, the available templates can include:
| Template | Intended use |
|---|---|
| Batch overview | Review input data, monitoring metrics, and target distributions. |
| Performance | Review evaluation metrics, targets, predictions, and sample-level performance. |
| Input metrics | Compare distributions of available sample-level monitoring metrics. |
| Error investigation | Investigate evaluation metrics, targets, predictions, and sample-level errors. |
| Monitoring view | Follow drift, novelty, and sample-level performance over time. |
Not every template is available for every task.
Create a dashboard
- Open Data Explorer > Dashboards.
- Select Create dashboard.
- Choose a starting point. If needed, select the source dashboard or template.
- Select Continue.
- Complete the Plots, Layout, and Data groups steps described below.
- Select Create.
Dashboard names must be unique within the task. The wizard shows the current maximum numbers of plots and data groups. These limits can vary by platform configuration, so use the values displayed in the wizard.
Step 1: Choose variables and plots
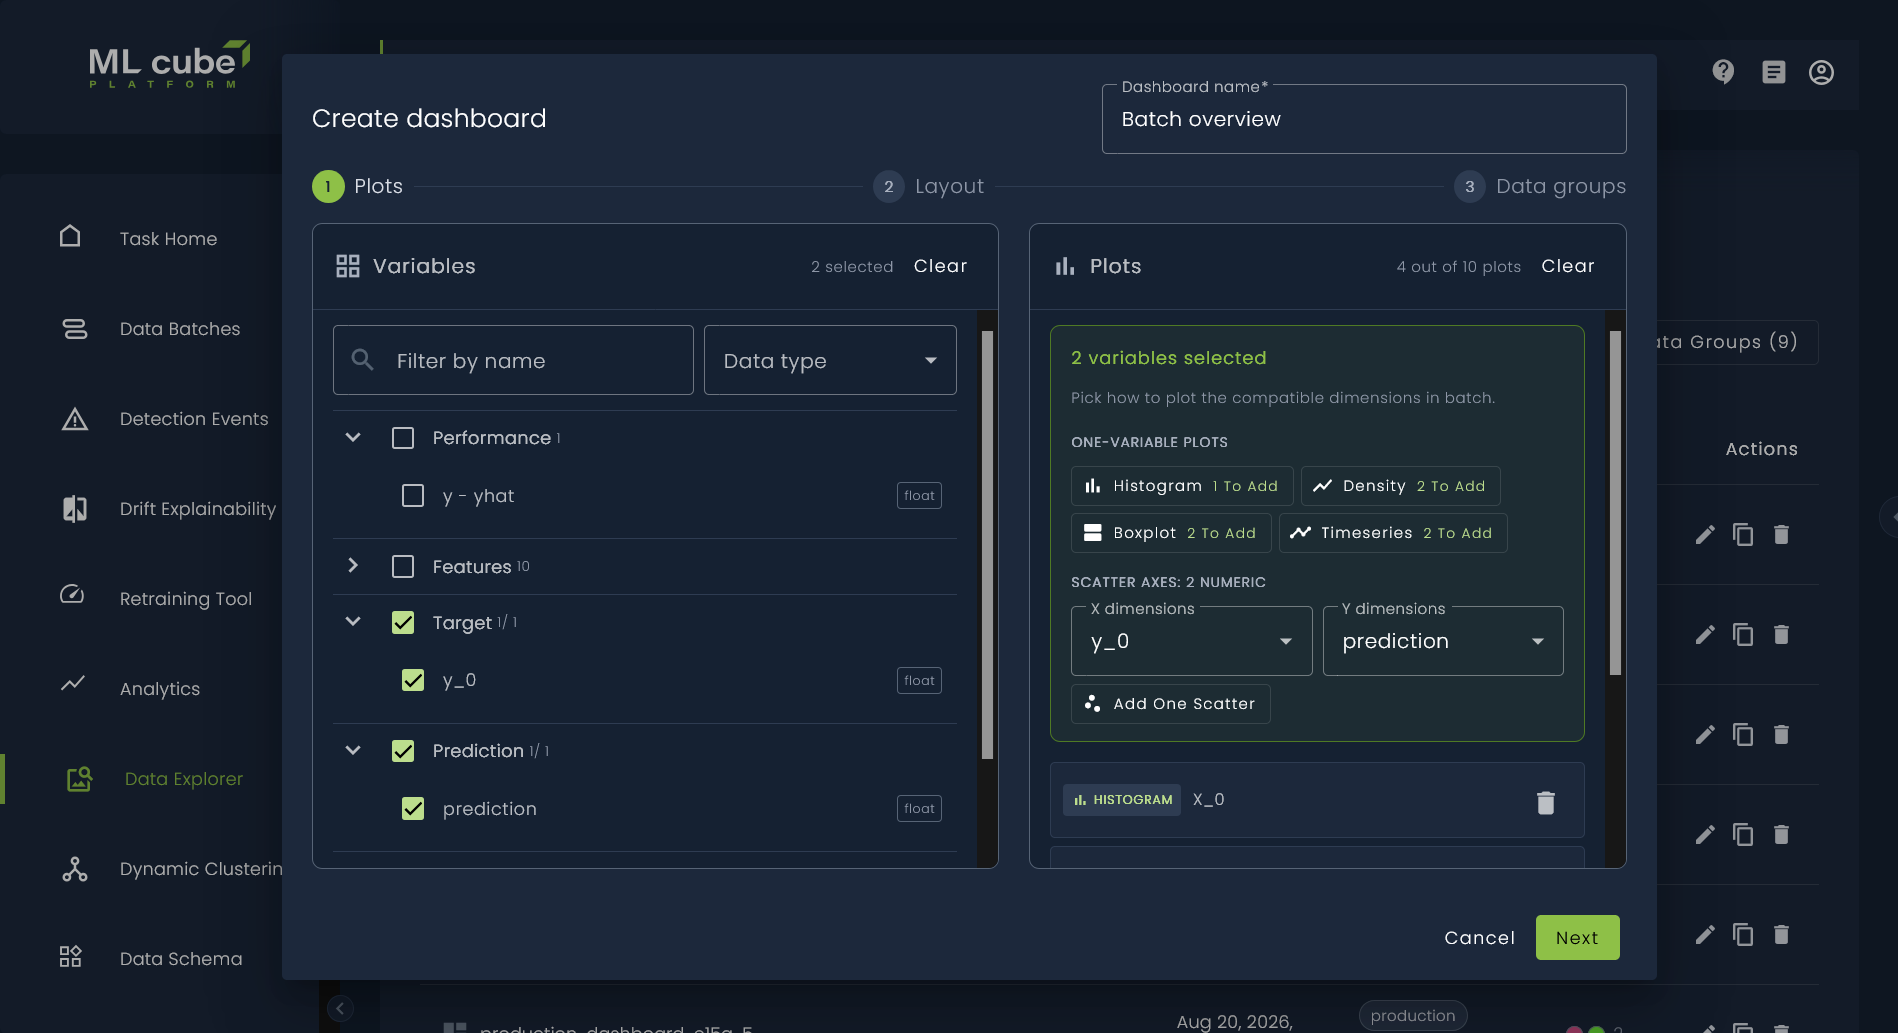
Enter a Dashboard name, then choose the variables to visualize.
Variables are grouped into the categories available for the task, such as features, targets, predictions, metrics, drift scores, performance, and metadata. Use Filter by name or Data type to find variables, or select an entire category.
After selecting variables, use a plot action to create plots in batch:
- Histogram, Density, and Boxplot are available for numeric variables.
- Frequency is available for categorical variables.
- Timeseries is available for numeric and categorical variables.
- Scatter compares two different numeric variables.
For scatter plots, select one or more X dimensions and Y dimensions. The wizard can create all valid X/Y combinations. Review the resulting count before adding them so that you do not exceed the plot limit.
The wizard identifies variables that are incompatible with a selected plot type. It adds only compatible plots. Review the plot list on the right, remove unwanted plots, and select Next.
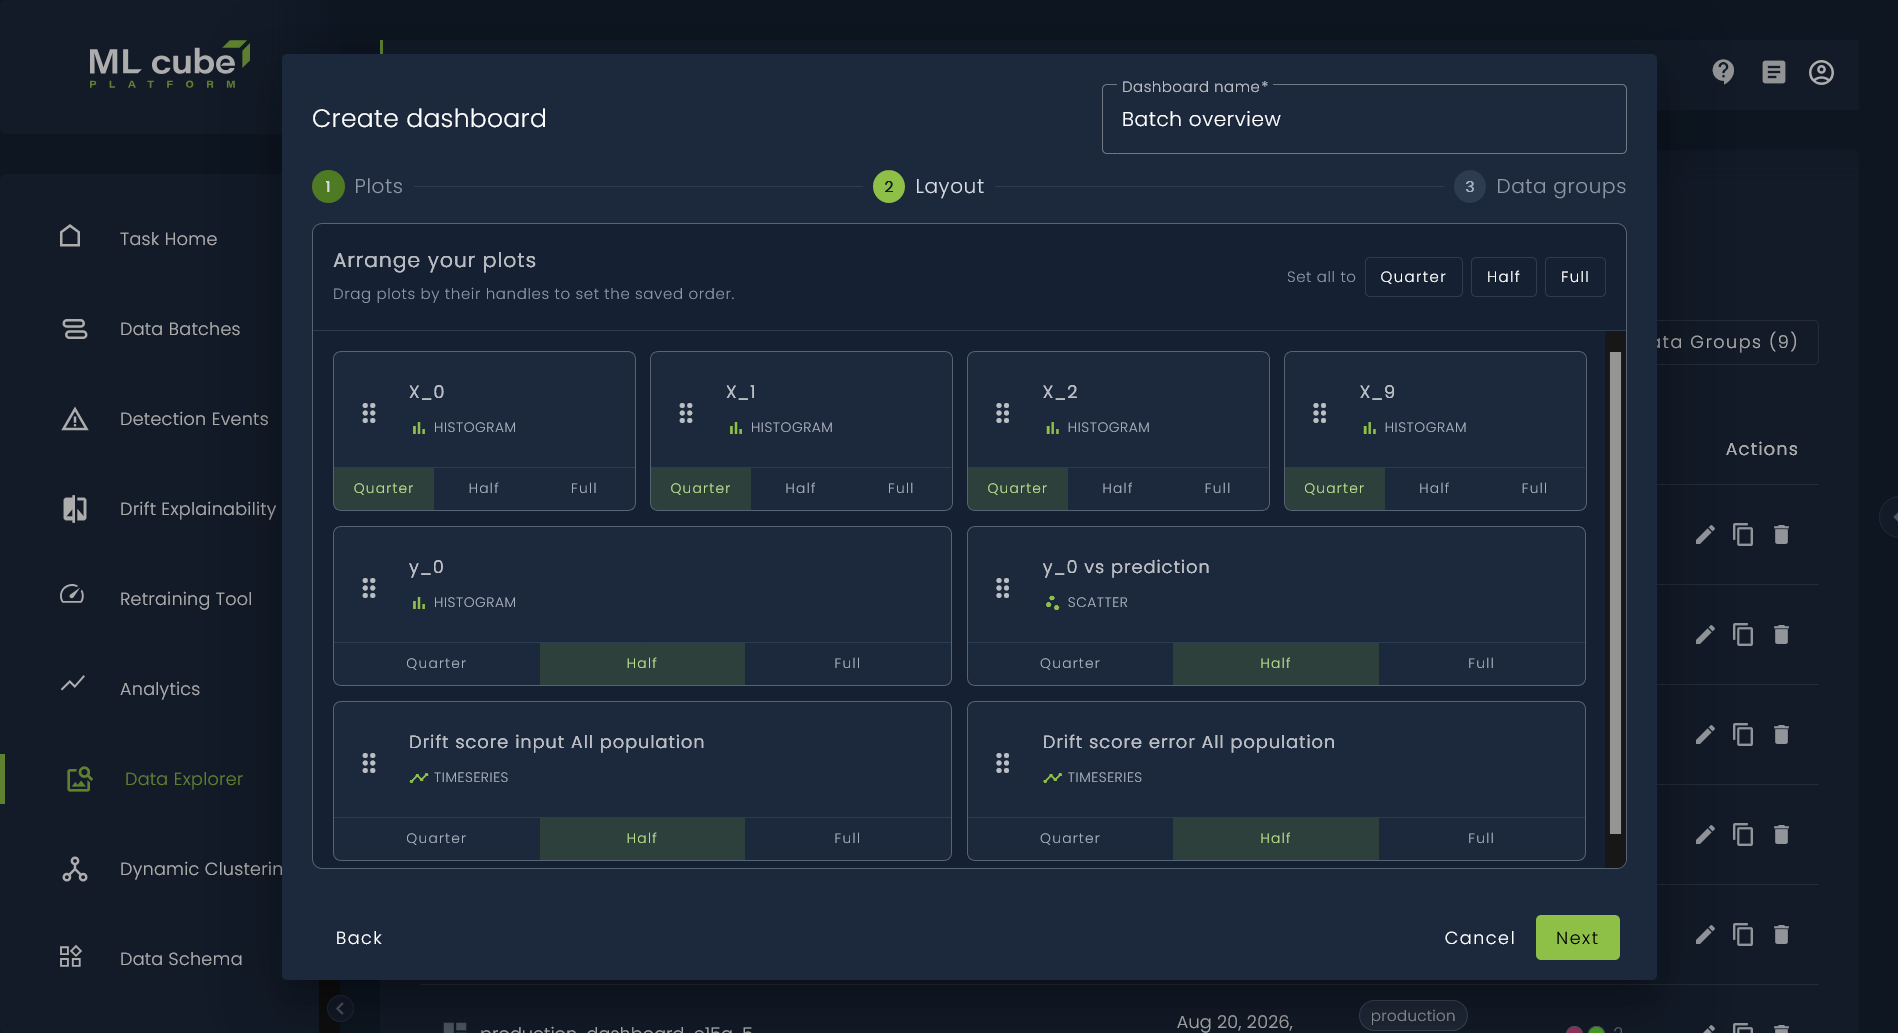
Step 2: Arrange the layout
Drag plot cards by their handles to set the saved order. Set each plot to one of the following widths:
- Quarter: one quarter of the available row.
- Half: one half of the available row.
- Full: the full row.
Use Set all to to apply one width to every plot, then adjust individual plots if needed. Select Next when the order and widths are correct.
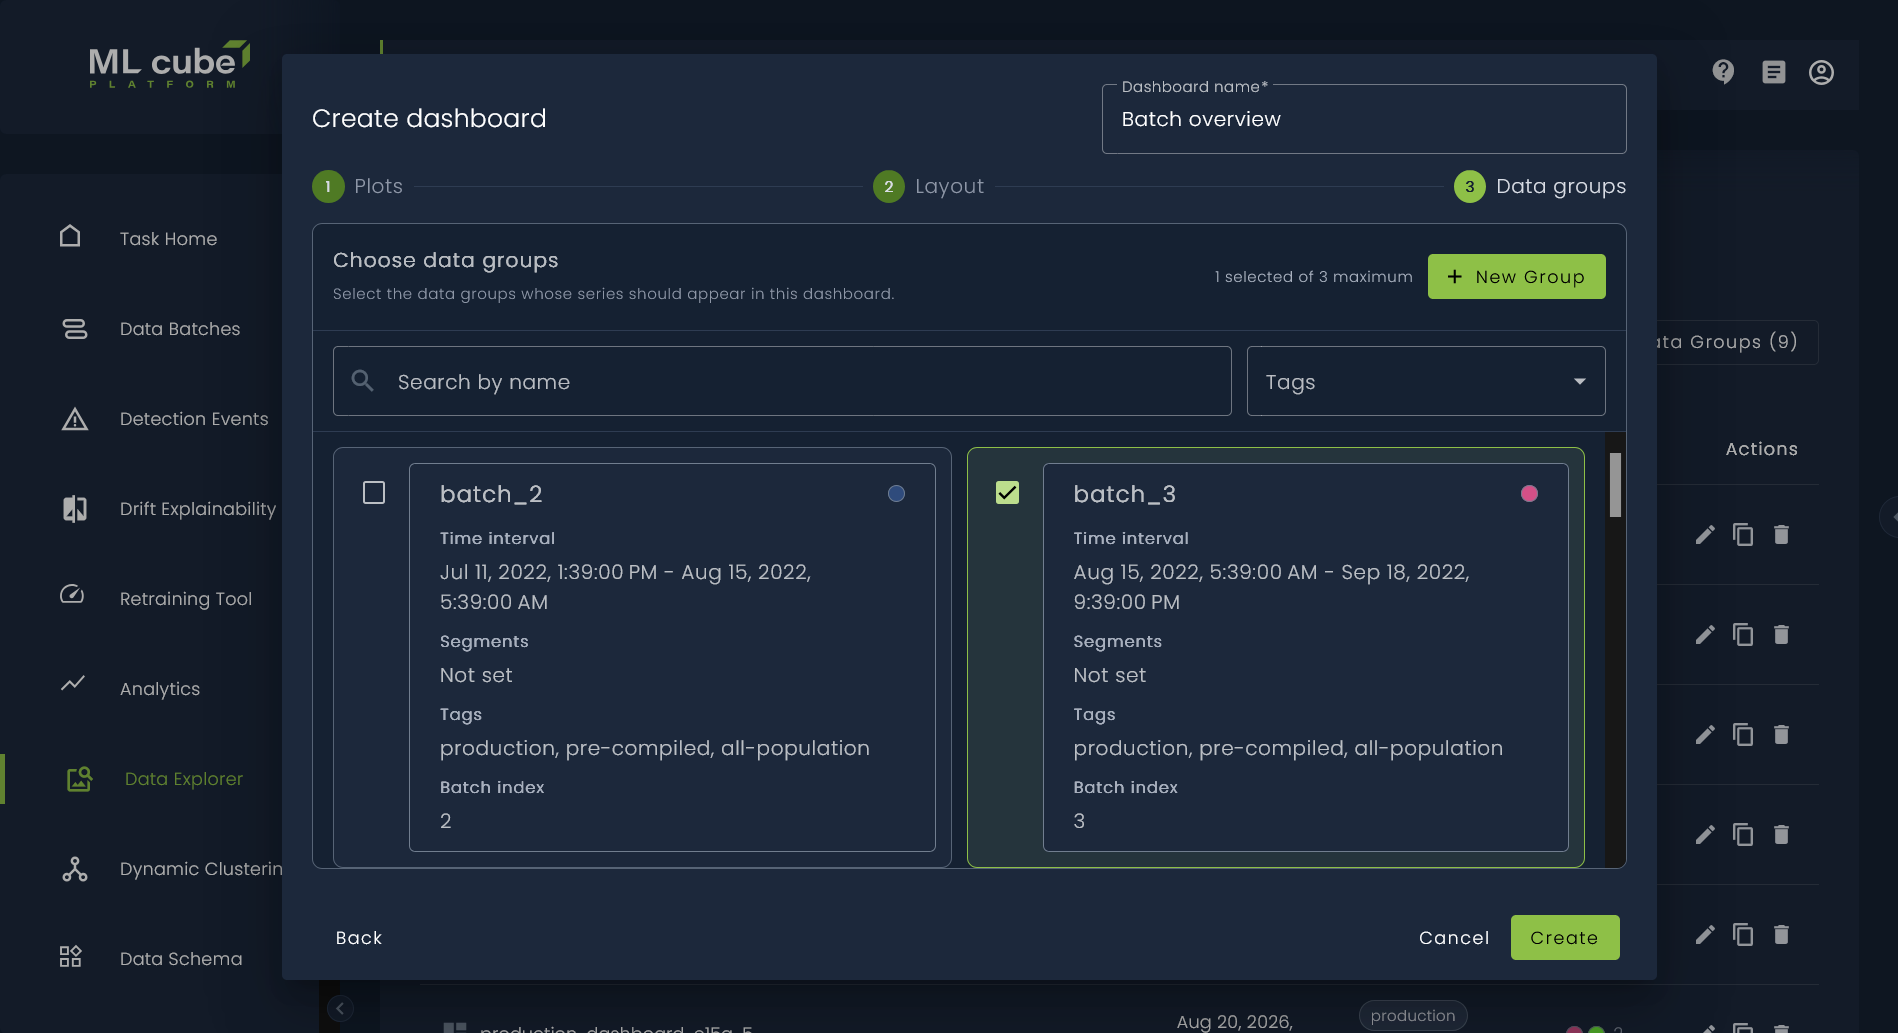
Step 3: Choose data groups
Select the data groups whose series should appear in the dashboard. Search by name or tags when the list is long. You can select up to the maximum shown by the wizard.
If the group you need does not exist, select New group, create it, and return to the selection. A dashboard may also be created with no data groups; it will not display plot data until at least one group is added.
Review the selection and select Create.
Plot types
| Plot | Use it to |
|---|---|
| Histogram | Compare the binned distribution and concentration of numeric values. |
| Density | Compare smoothed numeric distributions and identify skew or multiple peaks. |
| Boxplot | Compare medians, spread, quartiles, and potential outliers. |
| Frequency | Compare counts or frequencies for categorical values. |
| Scatter | Inspect the relationship between two numeric variables and identify clusters, trends, or outliers. |
| Timeseries | Follow numeric or categorical values in timestamp or sample order. |
The same group color is used in every plot. The legend below each plot identifies the groups currently displayed.
View and interact with a dashboard
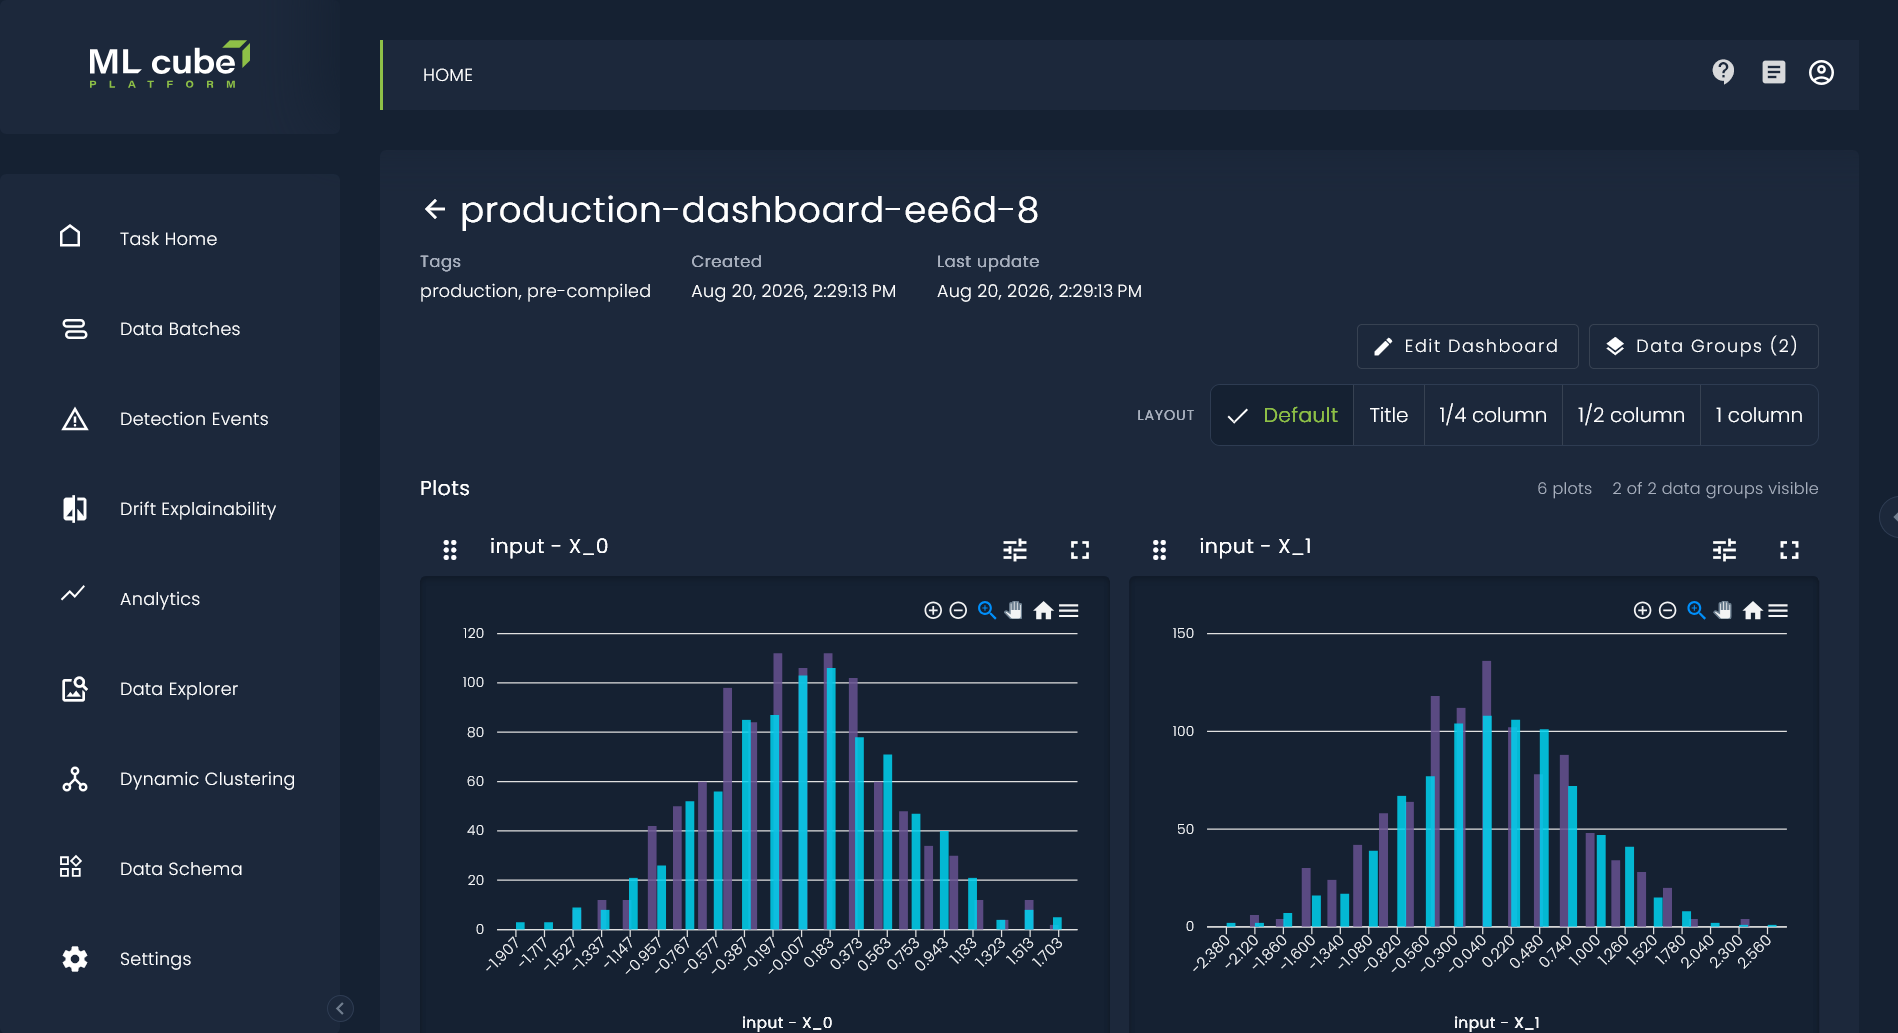
Select a dashboard row to open it. The page shows its tags, creation date, last update, number of plots, and number of visible data groups.
While viewing a dashboard, you can:
- Select the fullscreen icon to enlarge a plot.
- Use Data groups to add or remove groups from the dashboard.
- Use the eye icon on a selected group to hide or show it temporarily.
- Change a group's color or edit its definition from the Data groups panel.
- Drag plots to change their saved order.
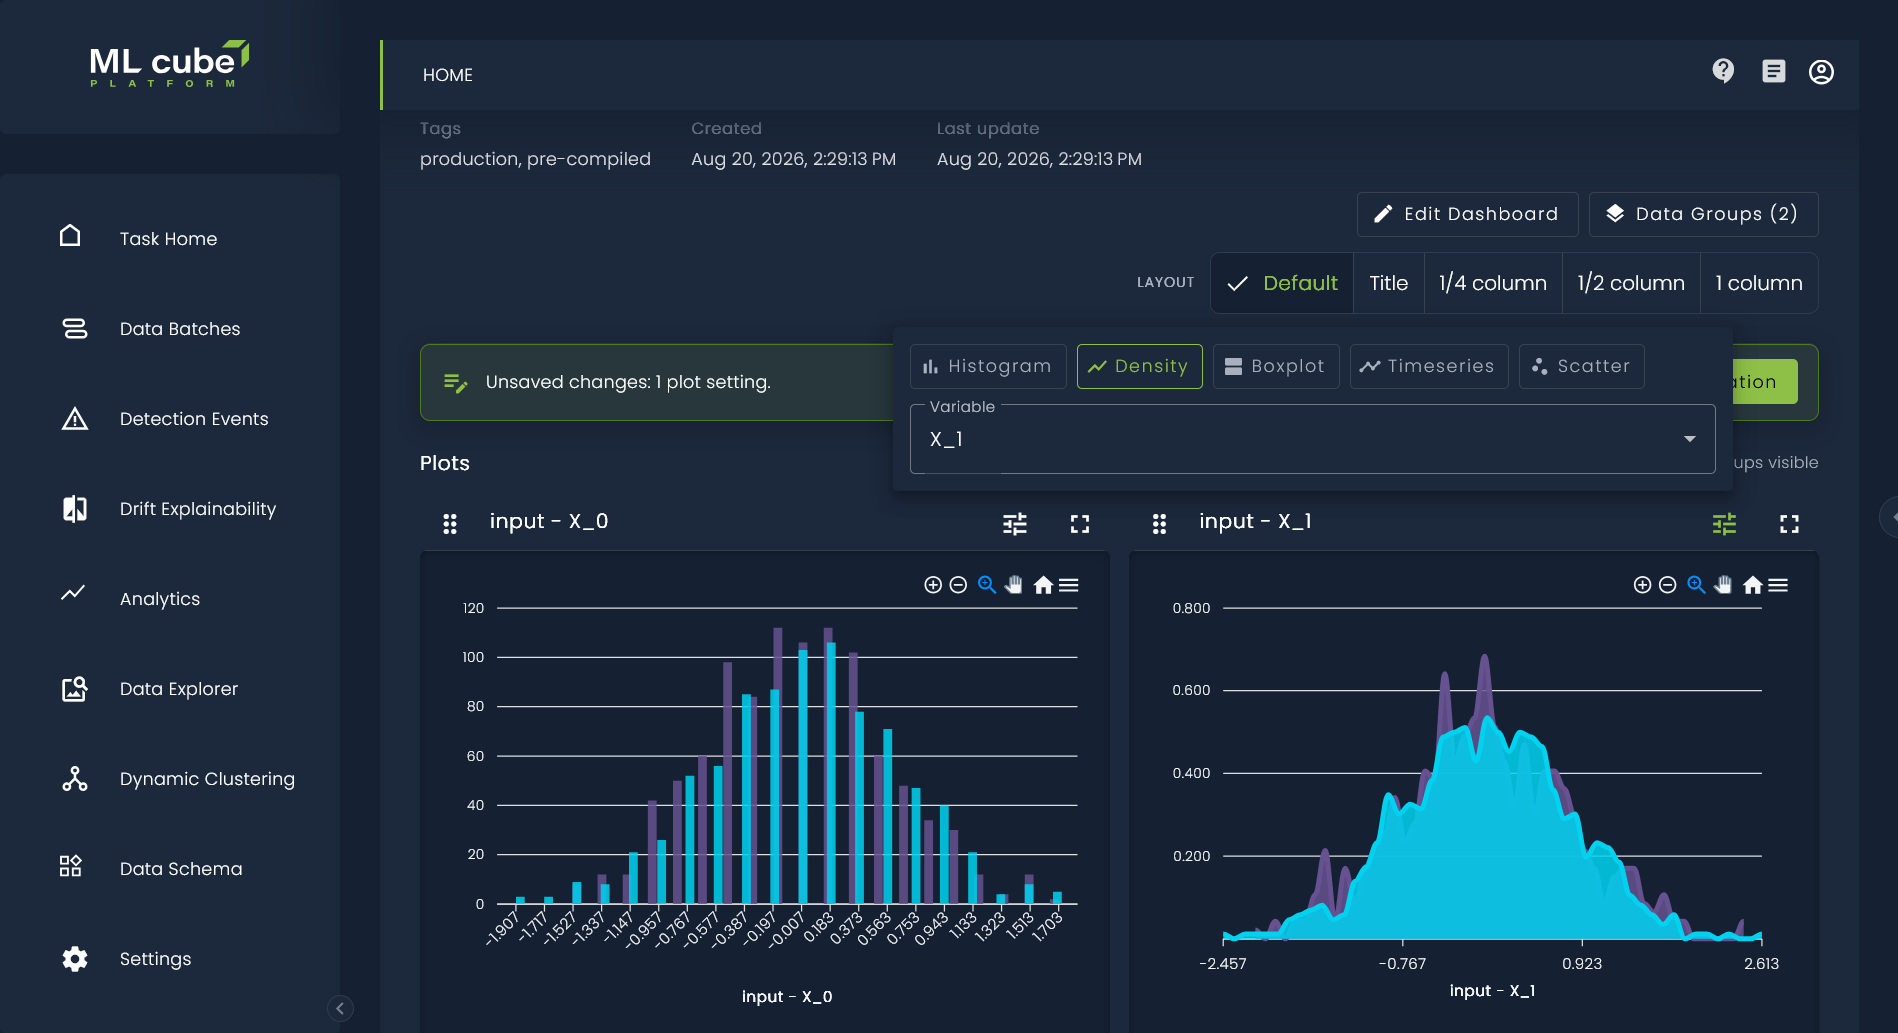
- Select the tune icon on a plot to choose a compatible plot type or variable.
- For a scatter plot, choose both the X and Y variables.
- For a time-series plot, select Use Samples as X Axis to switch between timestamp order and sample index.
- Use the Layout control to preview the saved layout, titles only, quarter width, half width, or one full column.
For a platform-created dashboard, viewing controls such as fullscreen and temporarily hiding or showing a group remain available, but its saved configuration cannot be changed. Clone the dashboard when you need an editable version.
Temporary controls and saved changes
Some controls help you inspect a dashboard without changing its saved configuration:
- Hiding or showing a group is temporary.
- Opening a plot in fullscreen is temporary.
- Selecting a Layout quick view is temporary. Default returns to the widths saved for the dashboard.
Other actions change the dashboard configuration:
- Adding or removing a selected data group.
- Reordering plots.
- Changing a plot type or variable.
- Changing the X or Y variable of a scatter plot.
- Switching a time-series plot between timestamp and sample index.
After one of these changes, an Unsaved changes bar appears. Select Save configuration to keep the changes or Revert to return to the last saved configuration.
Changes made directly to a data group, including its name, color, filters, and tags, apply to the shared group and are not part of the dashboard's unsaved-change bar.
Edit, duplicate, or delete a dashboard
The action icons on each dashboard row provide the following operations:
- Edit dashboard opens the three-step wizard with the current dashboard configuration. Change its name, plots, layout, or data groups, and select Save on the final step.
- Duplicate dashboard starts a new dashboard from the selected dashboard's configuration. Give the copy a unique name and modify it without affecting the original.
- Delete dashboard permanently removes the dashboard after confirmation.
You can also select Edit dashboard from the open dashboard page.
Warning
Deleting a dashboard is irreversible. Its plot configurations are deleted with it. Shared data groups and the task's source samples are not deleted and remain available to other dashboards.
Platform-created dashboards and groups
Depending on the task and platform setup, dashboards and data groups may be created automatically when reference or production data becomes available. They appear in the same lists as user-created items and are identified as platform-created items.
Platform-created dashboards are read-only. You cannot edit their name, tags, plots, layout, selected data groups, or plot order, and you cannot delete them. You can view them and select Duplicate dashboard or Clone to create an independent, editable dashboard.
Platform-created data groups are also read-only. You cannot change their name, filters, batch index, segments, or tags, and you cannot delete them. Their color is the only editable property, so you can keep plot legends distinguishable.
The pre-compiled tag is reserved for platform-created dashboards and groups. It cannot be added to dashboards or groups that you create or edit.
Troubleshooting
- No variables are available: confirm that the task has data and that its schema exposes variables supported by Data Explorer.
- A plot action is unavailable: select a compatible data type. Distribution and scatter plots require numeric variables, while frequency plots require categorical variables.
- The wizard cannot continue: enter a non-empty, unique dashboard name and remove plots until the displayed limit is satisfied.
- No data is visible: confirm that at least one data group is selected and visible, then check that its batch, time interval, and segments match existing samples.
- A group remains queued or fails to load: wait for the current group to finish loading, or select the retry icon shown on the group card.
- A plot change fails to refresh: select Retry in the plot editor.
- You changed the dashboard by mistake: select Revert before saving. If the change was made to a shared data group, edit that group again to restore its previous definition.